Until a week ago, I thought that smoothing was a relic of the past. I was wrong.
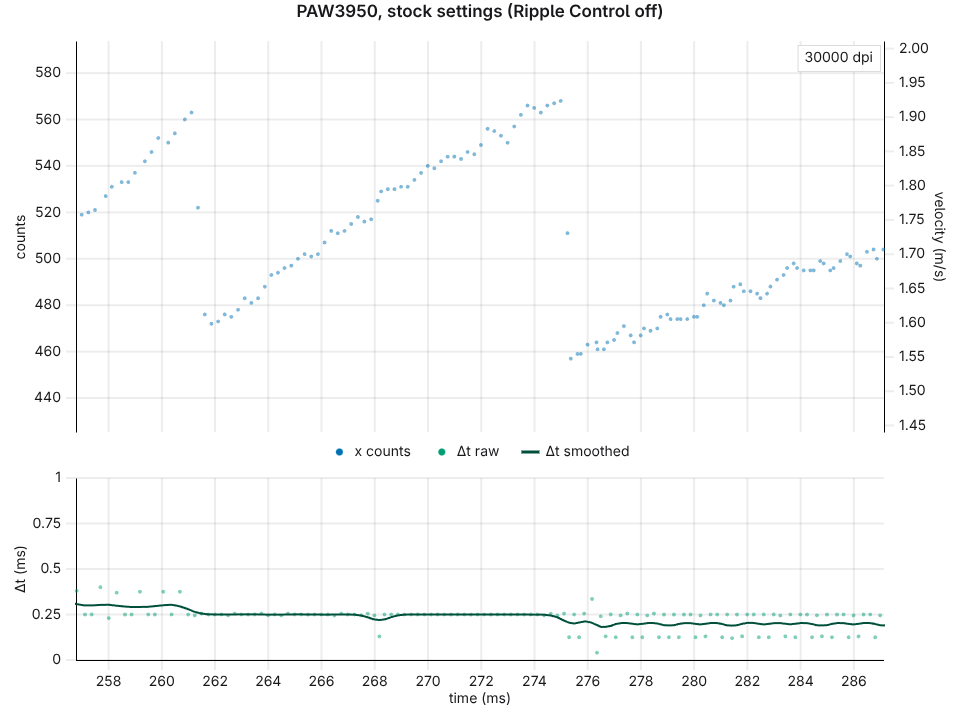
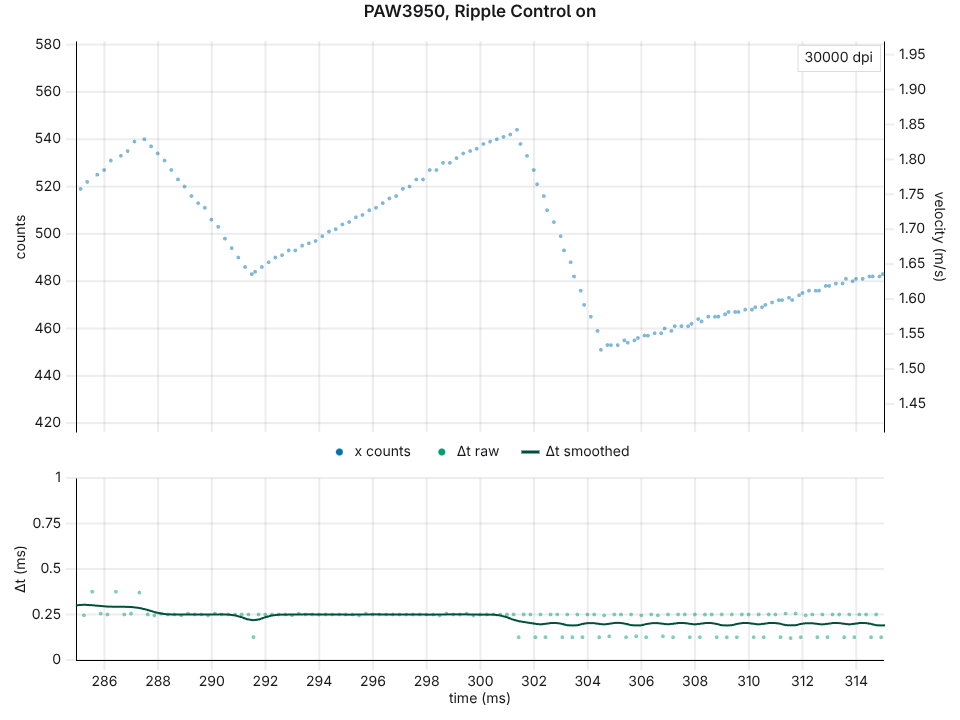
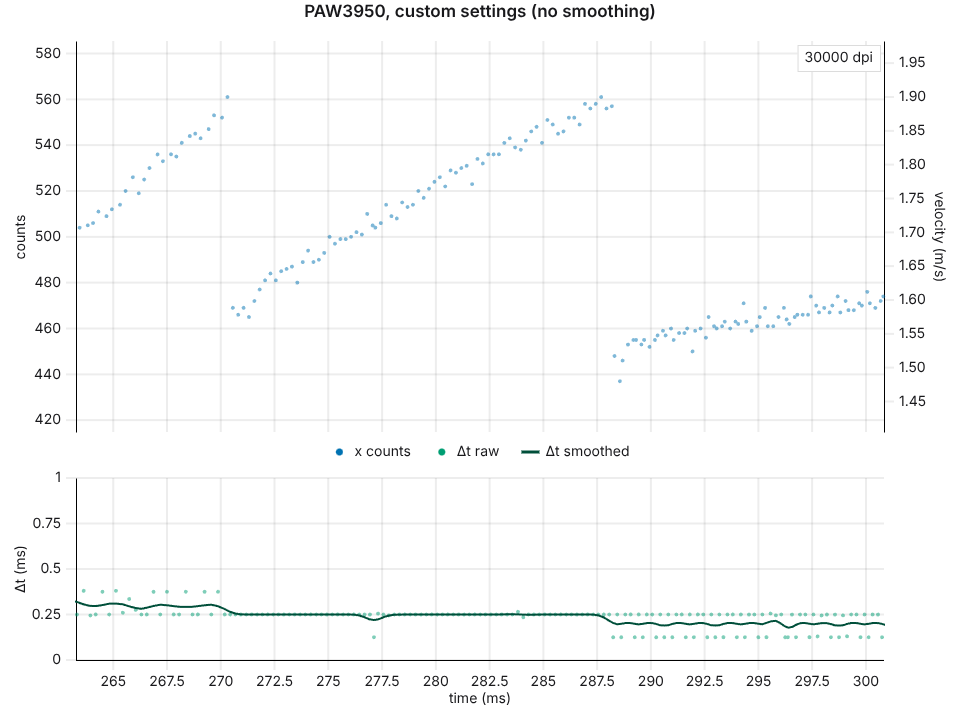
Don’t believe the lore. Don’t believe statements by reps from big companies. Trust what your own eyes see in the data. Read on to understand what these plots mean.
tl;dr: for mice with the PAW3950, DPIs below 5000 are mostly unaffected. Still need to test other sensors but highly highly suspect they’re all affected.
What is smoothing and why is it used?
Every time a sensor captures a frame, it performs a comparison against a previous reference frame to calculate the change (delta) in its position. In other words, sensors emit motion data on every frame. This data, like any data, has noise. At higher DPI, this noise becomes increasingly visible as cursor jitter.
DPI is still (yes, in 2026) the defining metric used to market a sensor, and it’s an unspoken rule that the newest flagship sensors must have a higher max DPI than older ones. So there’s a tension: the latest and greatest sensors must support absurdly high DPI, but using these high DPI values exposes the intrinsic noise of the raw motion data.
What can be done?
- Better algorithms for computing raw motion deltas.
- Post-process the data to filter out the noise. (i.e., “smoothing”)
- Silently lower the DPI when tracking is slow. (i.e., “DPI downshift”, discussed previously)
What smoothing does is apply a simple moving average filter to the raw mouse data. This can suppress noise and jitter, but it comes at a cost. How so? Here’s a quick, exaggerated, demo of smoothing (on the cursor position that your browser gets, not the raw sensor data). Move your cursor inside the box. The blue +‘s are the past positions of your cursor. The red X represents the smoothed position of your cursor.
This demo uses a 16 frame window. Note that these are browser frames, which probably are paced according to your display refresh rate. The first thing that you’ve probably noticed is that the smoothed cursor position lags behind. The amount of lag is effectively behind the latest cursor position, where is the time per frame and is the number of frames of smoothing. I use “effectively” here because smoothing doesn’t correspond to a simple delay. The actual path that the smoothed cursor travels along is actually different from the original path. If you move your cursor in the box in quick circles, or back and forth, you’ll see that the path taken by the red X is smaller than the blue +‘s.
So, the cost of smoothing is that the actual motion that the sensor should be transmitting is delayed and distorted.
It has been a long time since any mouse/sensor has had enough smoothing that the lag is extremely obvious. As far as I know, the history is something like this. Smoothing made its first appearance in the ADNS-9800 laser sensor. These are largely the same optical sensors that we use nowadays except the source of illumination is a laser diode instead of an LED. The speckle patterns that the sensor sees from the laser illumination lead to substantial jitter, and so some early SROM (the code that runs on the sensor) revisions for the ADNS-9800 used an obscene amount of smoothing to filter out the jitter. This was later toned down, but as I understand, once the community got a taste of the ADNS-9800, questions arose regarding whether other sensors actually have a minor amount of smoothing as well.
Without an objective way to discern the presence and amount of smoothing, people relied on their own perception and debates raged on concerning whether sensor XYZ has smoothing, whether user ABC is insane, etc. You can find many discussions in the early-to-mid 2010s on ESReality, Overclock.net, geekhack, etc.
How to detect and measure smoothing
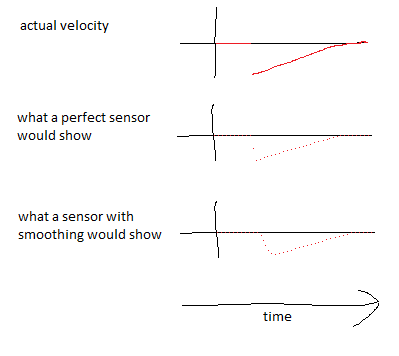
I came up with an idea back in 2014: knock a mouse sharply, and plot its motion deltas against time. A responsive mouse will show a sharp rise in the plot, while a mouse with smoothing will have the rise, smeared out over the duration of the smoothing. Here’s the original mspaint drawing I sketched:
microe released MouseTester in early 2015, which allowed the community to easily make these plots of motion counts against time. Not too long after, my idea was realized, exactly as predicted, with corroborating consequences on tracking latency. But this method is only reliable when the amount of smoothing exceeds 2 ms or so, because a sharp knock on a mouse still involves contact time of 1 ms or so where the mouse physically accelerates.
Framerate transitions
Around the same time in mid-2015, Overclock.net folks and I also realized that smoothing is associated with sudden artifacts (blips) in the motion counts whenever the sensor framerate jumps from one stage to the next. The blips are partially a consequence of the fact that sensor framerates far exceed the 1000 Hz polling rate. With 8000 Hz nowadays, things are a lot easier to understand.
What happens when sensor framerate jumps, is that the (raw unsmoothed) motion counts drop instantaneously. For example, if the sensor outputs 50 counts every 0.5 ms, and the sensor suddenly doubles its framerate so that the frame period is 0.25 ms, the counts it outputs will drop to 25. This is because the actual velocity of the motion doesn’t change discontinuously. When the USB polling rate exceeds the framerate, you can see this directly in plots. For example,
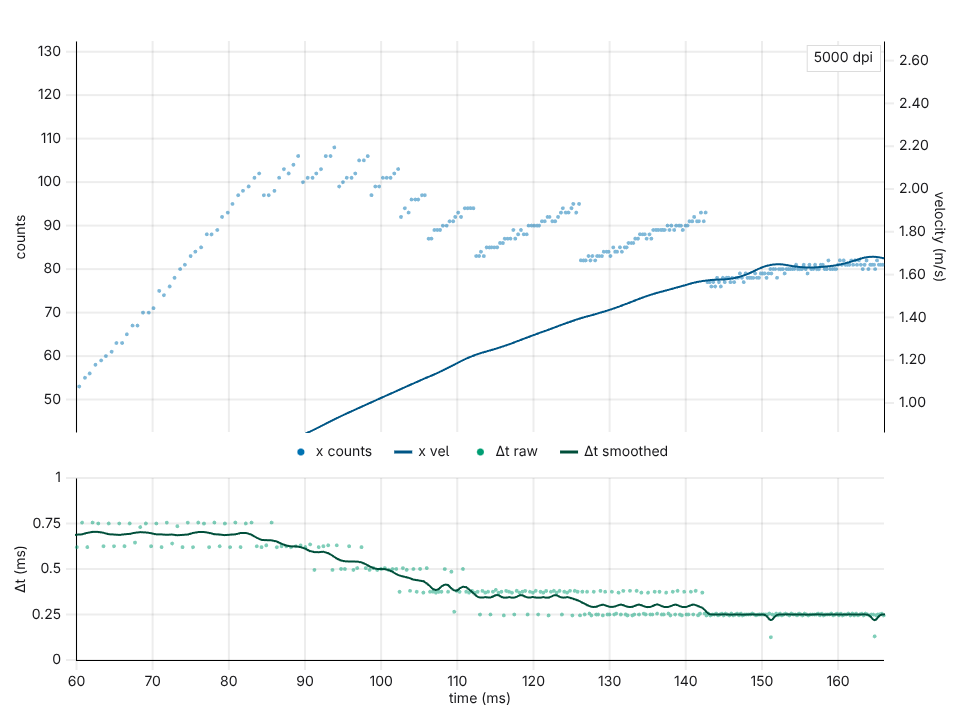
This is a PAW3950 at 5000 DPI set to “high performance” mode, which is a mode with dynamic framerate scaling. The framerate goes through several stages here. Luckily, the framerates are less than the 8000 Hz USB polling rate, meaning that every count shown here comes from precisely one frame of data. As expected, as the framerates increase, as can be seen in the bottom timing plot, the x counts drop suddenly. At the same time, the velocity trace is completely smooth through all these transitions.
In the PAW3950 and also the past couple PixArt sensors (3395, 3399, 3389), there is a register named “Ripple_Control”. This is essentially a toggle for smoothing. For example, here’s the PAW3950, at 30000 DPI, “high performance” mode, now with ripple control enabled.
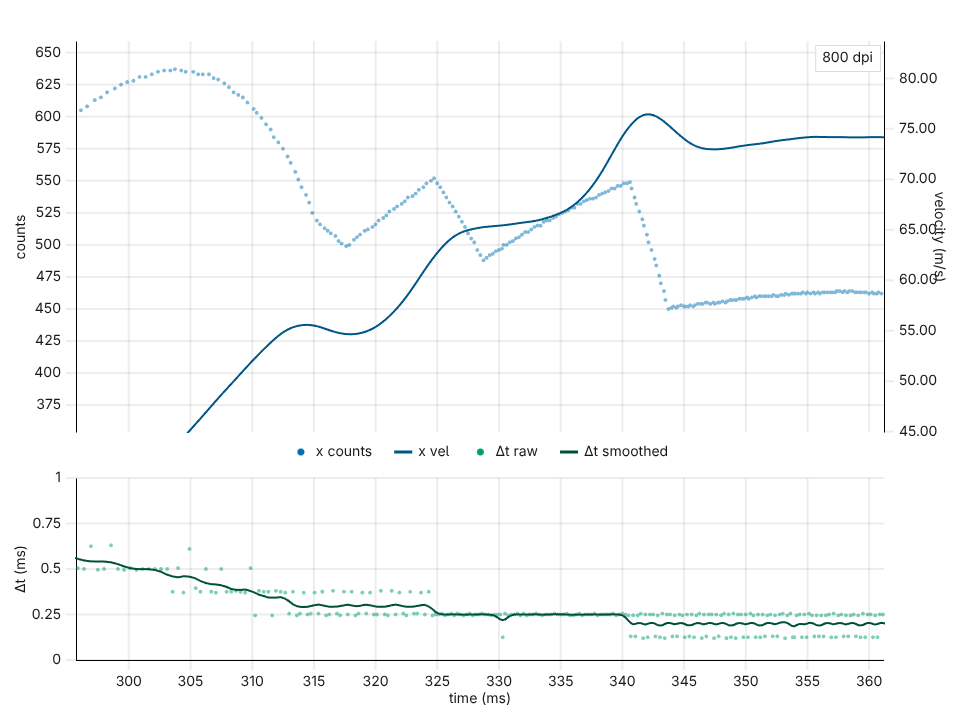
The previously sharp drops in x counts in each stage are now smeared out. If you count the number of points in the drop, you’ll find 15, meaning that the sensor is averaging the last 16 frames of data, so 16 frames of smoothing. If you’re wondering why the numbers differ by 1, consider that if you average 1 frame of data, you do nothing, so you’ll have 0 points in between the drop.
Now for the PAW3950, what happens at 30000 DPI, “high performance” mode, now with ripple control disabled? This is what I showed at the very top:
That single point in between each drop means that the sensor is averaging 2 frames of data. 2 frames of smoothing, clear as daylight, in the stock (high performance mode) settings of the PAW3950, with the ripple control register disabled.
PAW3950 smoothing vs DPI and settings
By the same kind of plots, I determined the threshold DPIs where the amount of smoothing increases for the PAW3950.
| Ripple Control | DPI ≤ 5000 | 5050 ≤ DPI ≤ 10000 | DPI ≥ 10500 |
|---|---|---|---|
| Disabled | None | 2 frames | 2 frames |
| Enabled | None | 2 frames | 16 frames |
Now this data was collected in high performance mode, but I am certain the same behavior occurs in the PAW3950’s “Corded gaming” modes. These modes are constant framerate modes, which makes the previous analysis impossible. The knock test isn’t accurate enough to detect 2 frames of smoothing. But we can analyze the noise in the data.
As an example, compare the amount of noise in the data at 5000 vs 5050 DPI, in the “Corded gaming (low DPI)” mode.
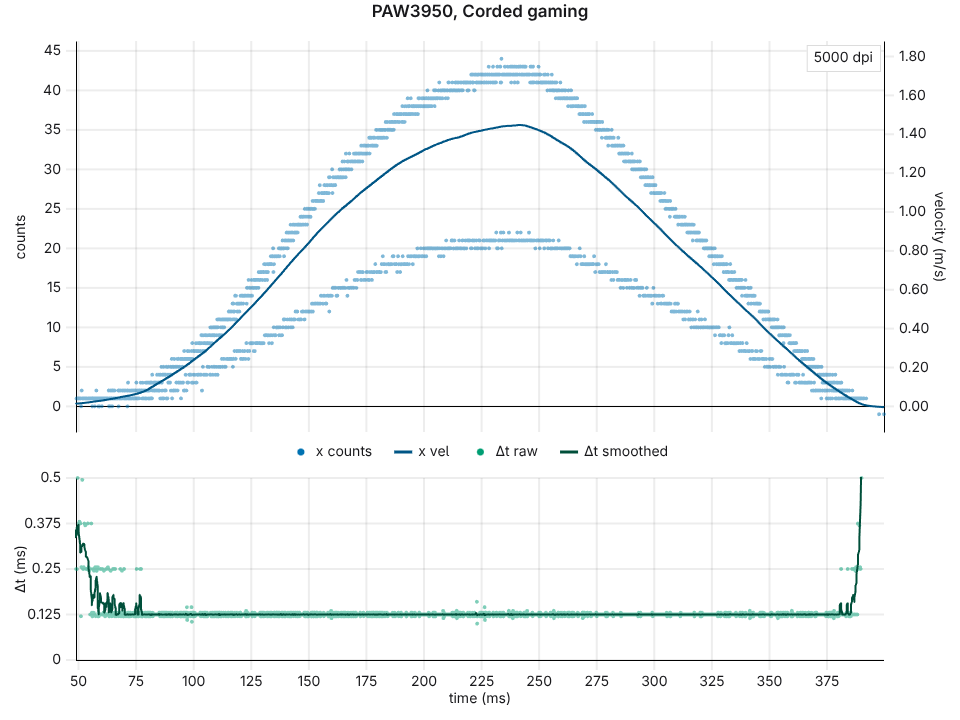
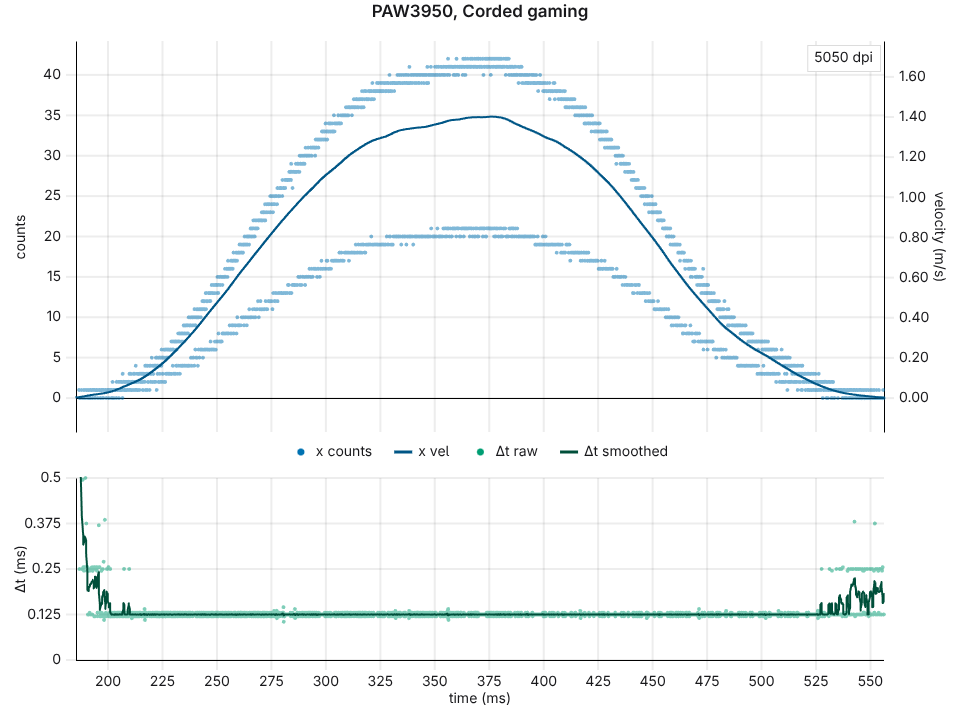
It’s hard to tell, but if you do this a couple times you’ll find, consistently, a tiny bit more noise at 5000 DPI than at 5050 DPI. This comparison, in isolation, is probably not convincing. The stronger evidence is below.
Disabling smoothing on the PAW3950
By some trial and error, I found the register setting that disables smoothing on the PAW3950, at all DPIs. (Just DM me on Discord if you want to know. NOTE: this is not something most people can try. You need to either make your own firmware or otherwise edit your mouse’s firmware.)
Here’s a comparison of 30000 DPI, corded low mode, with and without this setting.
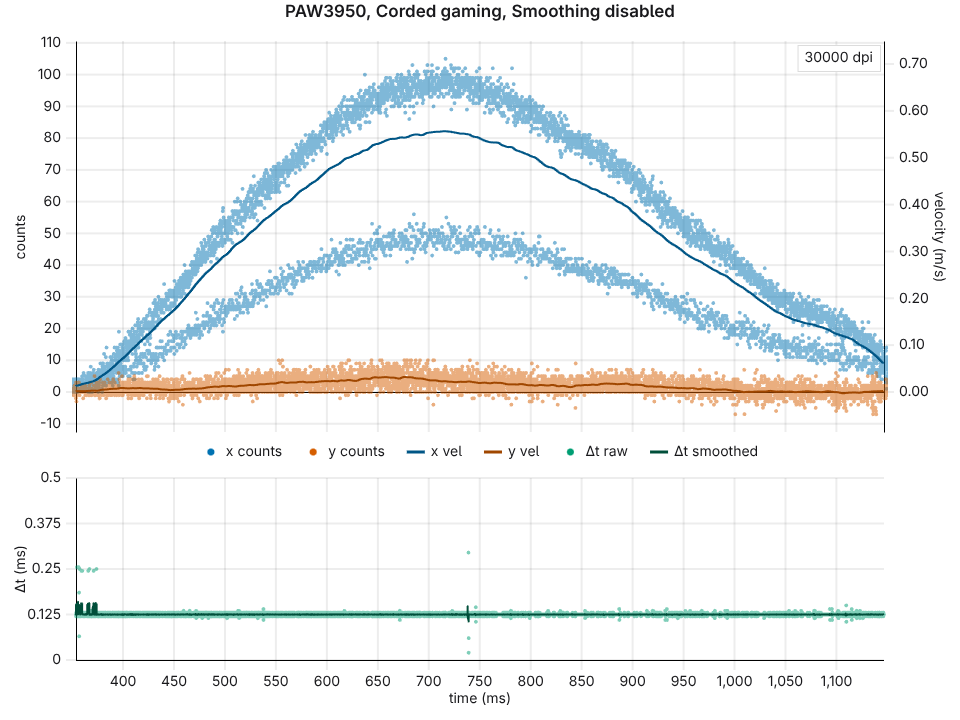
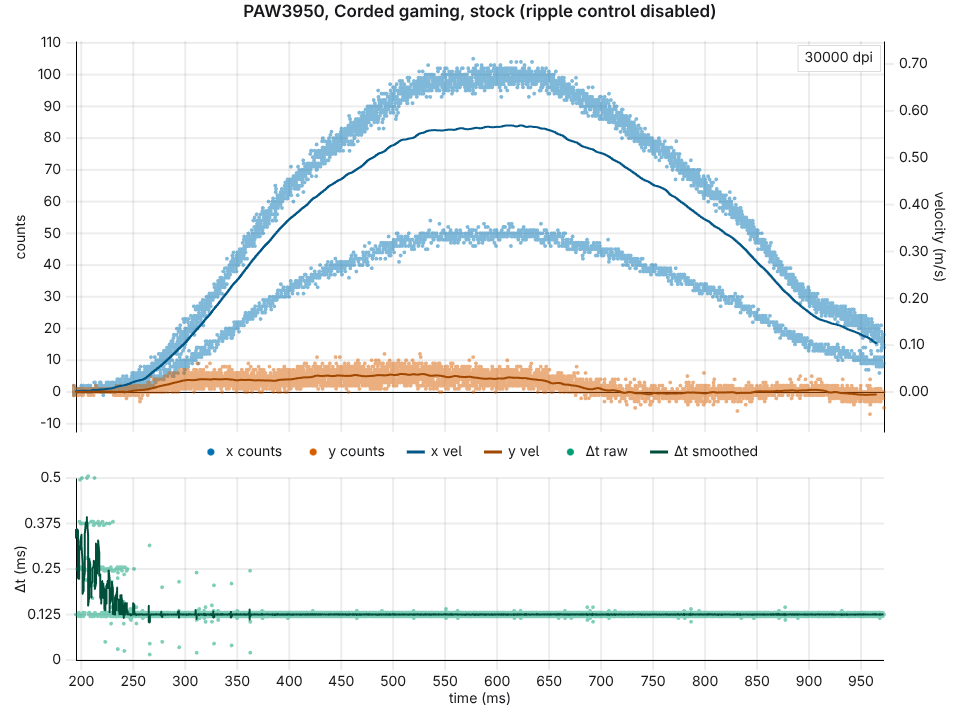
This shows a small but clear difference in the amount of noise. Applying this setting to high performance mode, the isolated dots in between the framerate transitions are now gone even at 30000 DPI, confirming that smoothing can be disabled for the entire range of DPI.
Additional smoothing following set-down
Remember when I said “DPIs below 5000 are mostly unaffected”? The “mostly” has a caveat.
A common occurrence when using any mouse is lifting it up and setting it back down. Turns out, in the PAW3950, smoothing increases for a period of time after setting the mouse down.
Here’s an example: I swipe while setting the mouse down, so there are motion counts immediately from .
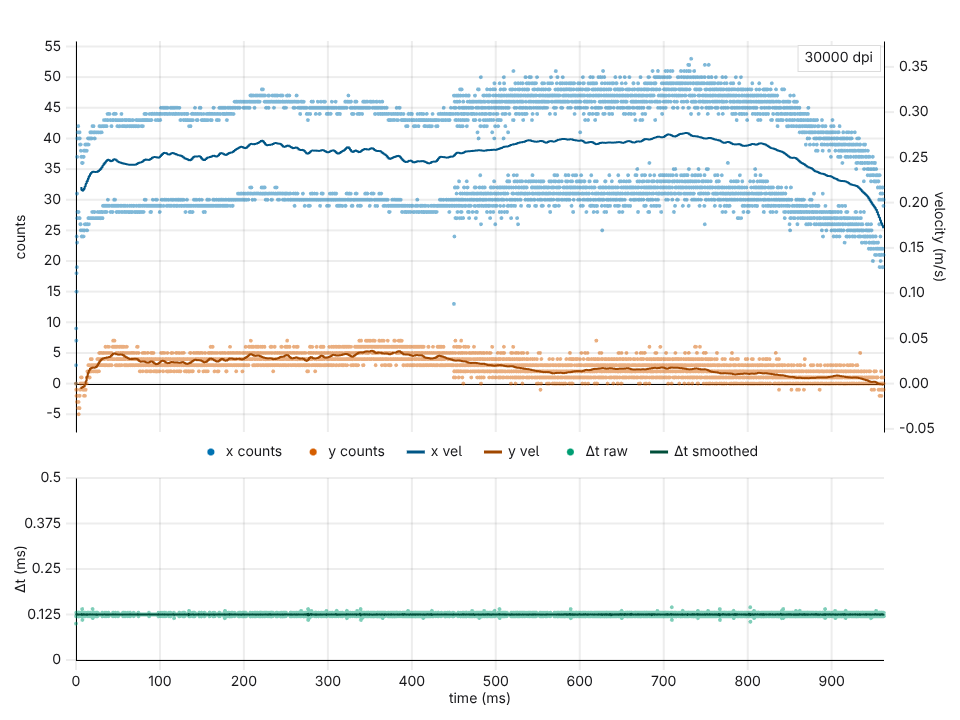
From 0 to 450 ms, the sensor has 16 frames of smoothing (determined by carefully comparing noise). This applies to Corded Gaming modes. Enabling or disabling ripple control does not affect the amount of smoothing in this set-down interval. Lowering DPI doesn’t help; I checked by setting a super low framerate, so that smoothing results in extremely obvious lag.
The smoothing-disable register setting described previously does not completely turn off this set-down interval. It does reduce it from 16 to 2 frames (again determined by analyzing noise).
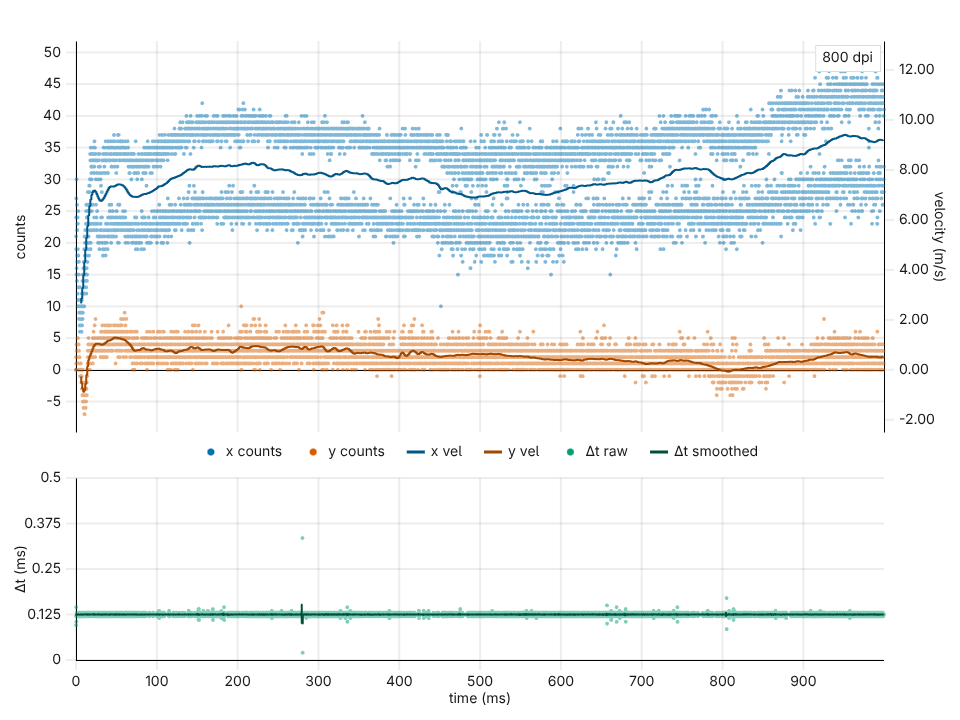
Furthermore, it’s possible, by another register, to decrease this 450 ms interval down to roughly 12 ms. So with these settings, the PAW3950 can run almost entirely without smoothing: just 2 frames of smoothing for the 12 ms following set-down.
For PAW3950 mice that use the corded gaming modes exactly as specified by the datasheet, even at 5000 DPI and below, one experiences nearly half a second where smoothing is raised to 16 frames, every time the mouse is placed onto the mousepad. The dynamic framerate modes (high performance, low power) have a shorter set-down interval.
I don’t know why PixArt does things like this. 450ms is really excessive.
Not just PAW3950, Viper V4 Pro too
By the way, this set-down interval is not unique to the PAW3950. There’s something similar that happens on the Viper V4 Pro:
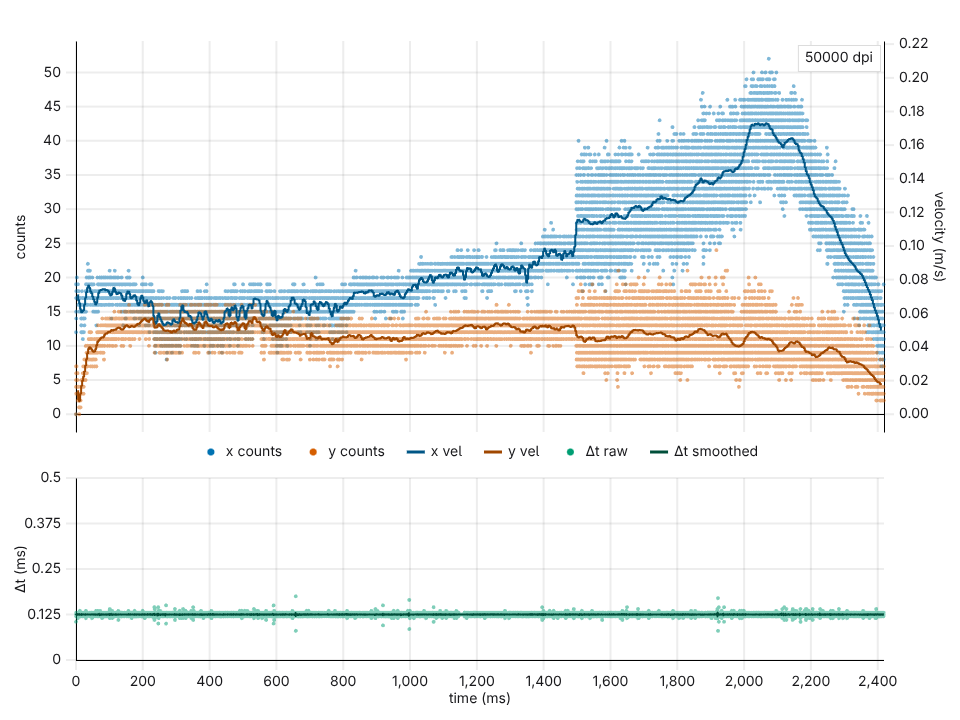
I haven’t fully understood what exactly is going on, but it’s even more odd than the PAW3950. The velocity trace suddenly jumps at 1500 ms. This is quite repeatable and seems to be a quite serious inaccuracy of this latest-generation sensor.
I still need to check other sensors like the 3399, 3395, and 3955. But my main takeaway from all this is that all PixArt sensors are guilty of smoothing or other odd processing algorithms, unless proven innocent.
Summary table (3950), and what the XA25 does
Here’s a full table collecting all the info I have so far on the PAW3950. I include also an intermediate Ripple Control setting that I found.
| DPI range | Smoothing disabled (XA25 default) | Ripple Control disabled (PAW3950 default) | Ripple Control intermediate | Ripple Control enabled |
|---|---|---|---|---|
| [50, 5000] | None | None | None | None |
| [5050, 10000] | None | 2 frames | 2 frames | 2 frames |
| [10500, 30000] | None | 2 frames | 8 frames | 16 frames |
| Set-down smoothing (all DPIs) | 2 frames | 16 frames | 16 frames | 16 frames |
The XA25 exposes all these settings in the Advanced tab of its control panel.
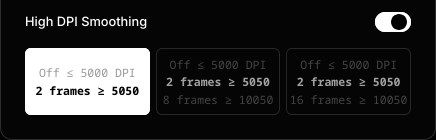
The default is to toggle off “High DPI Smoothing”, which corresponds to the “Smoothing disabled” row of the table above. In addition, the set-down interval is, in all modes, set to its minimal value of 12 ms; I haven’t found out yet how to turn it off entirely.
I personally believe that smoothing, like downshift, never belongs on a mouse sensor. But I’ll provide these options on the XA25, at least so that people can test.
Summary tables for 3395 and 3399
Update 2026-07-19: Instead of relying on “high performance” mode for dynamic framerate, I can use the corded gaming mode and simply set the minimum framerate register (see downshift article) to give a low framerate. This turns on dynamic framerate, and their associated transitions, without touching any registers. This provided further confirmation that smoothing behavior is identical in all standard modes (as in the modes listed in datasheet).
I dug out some old XA25 prototype PCBs that have 3395 and 3399 sensors. Both 3395 and 3399 have 2 frames of smoothing at all DPI with ripple control disabled (the default). Here are the results for the 3395:
| DPI range | Ripple Control disabled (default) | Ripple Control enabled |
|---|---|---|
| [50, 2000] | 2 frames | off (!) |
| [2050, 3500] | 2 frames | 2 frames |
| [3550, 6400] | 2 frames | 4 frames |
| [6450, 15950] | 2 frames | 16 frames |
| [16000, 26000] | 2 frames | 32 frames |
Yea, that’s not a typo. If you’re using 2000 DPI or less, turning on Ripple Control will turn off smoothing on 3395. Go figure…
And the 3399:
| DPI range | Ripple Control disabled (default) | Ripple Control enabled |
|---|---|---|
| [50, 2000] | 2 frames | 2 frames |
| [2050, 3500] | 2 frames | 4 frames |
| [3550, 6400] | 2 frames | 16 frames |
| [6450, 20000] | 2 frames | 32 frames |
Fortunately, 3395 and 3399 have only a brief 10 - 20 ms interval of set-down smoothing.
I don’t have a 3955 mouse yet, or a datasheet, and I’ll update this again once I do and have all the data. panDAHLING in our Discord shared the following data from a 3955 mouse:
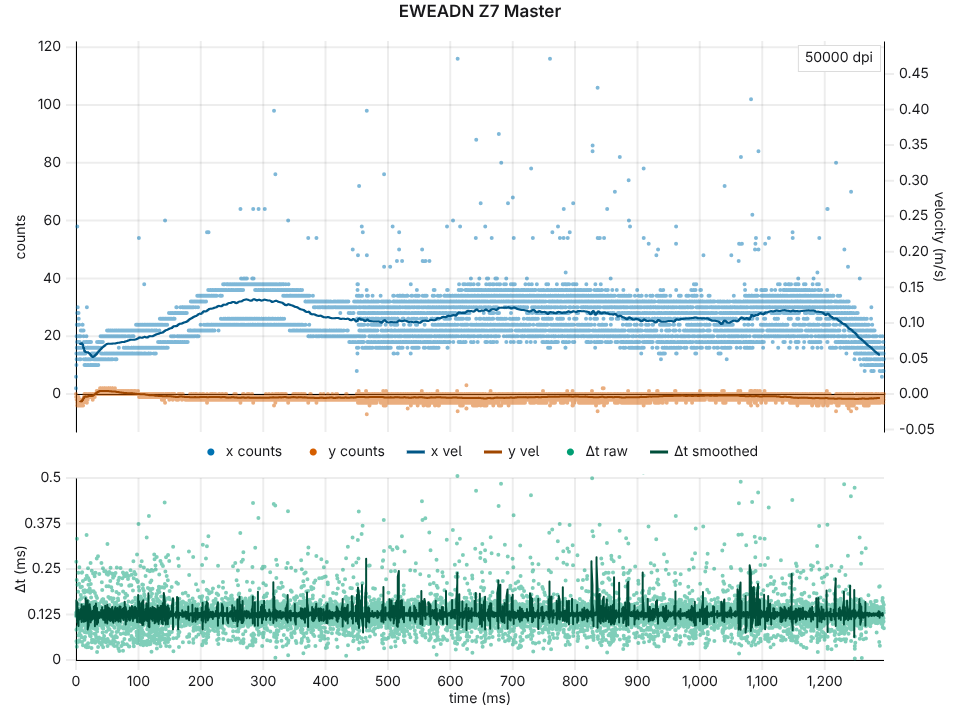
This confirms that 3955 has the same ridiculous 0.45 second interval of set-down smoothing as 3950. I would guess that 3955 and 3950 behave quite similarly in terms of smoothing in normal operation.